this is a favorite lip balm recipe that you would love i would love to make it and sell it once i can i want to make them and sell them that everyone would like and i can't wait to try it
HOW TO DO DIAMOND PAINTING
Diamond Painting: Step-by-Step Instructions for a Sparkling Masterpiece

Did you just receive your very first diamond painting? Are you ready to immerse yourself in this addictive activity? Diamond Painting is a relatively new hobby that has become increasingly popular in recent years. Hybrid between paint-by-numbers and cross stitch, where small diamonds are applied to an adhesive canvas, diamond painting allows you to create sparkling works of art!
For beginners, Diamond Painting is an ideal introduction to the world of needlework, as it is easy to learn and quickly produces stunning results. For the more advanced, there are a variety of challenges, from larger to more complex designs. You can also create your own designs from a photo and order custom kits to create a unique work of art. Have a look at our blog article on how to create your diamond painting from your own picture!
Did you know the benefits were numerous? It can help you relieve stress and boost your creativity while creating a sparkling work of art. It's also a great way to spend time alone or with friends and family.

It is now time to get into the heart of the subject and give you all the instructions to create your first diamond painting! Are you ready to jump right in? Don’t worry, the process is simple, it only requires patience and attention to detail. We'll show you how to do diamond painting step-by-step and create your masterpiece.
No matter the size of your canvas or the shape of the diamonds, how to do diamond painting doesn't change! Here is our instructions to create your next masterpiece!
STEP 1: GET YOUR DIAMOND PAINTING KIT AND TOOLS
To get started, you'll need a diamond painting kit. Figured’Art diamond painting kits come in a variety of sizes and designs and include all the accessories you need to get started: an adhesive canvas, drills, diamond painting pen, and wax pad and a tray. Have a look at our blog article on diamond painting accessories to get a glimpse of what they are and what are their use. You can also purchase additional accessories, such as a light pad or storage container, to make the process even easier.
STEP 2: PREP YOUR WORKSPACE
Find a clean, flat surface to work on, and lay out your supplies. Make sure you have good lighting, as you'll need to be able to see the tiny diamonds clearly. If you're working with a large canvas, consider using a light pad underneath to make the process even easier.
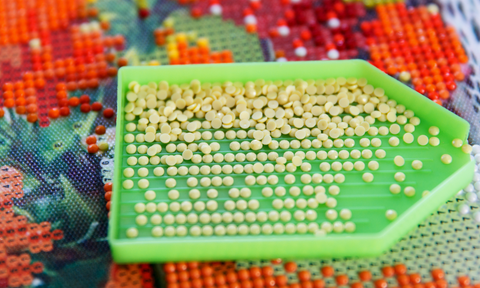
STEP 3: LOOK AT THE LEGEND ON THE SIDE OF THE CANVAS

The legend is located on the side of the canvas. As you will notice, the pattern printed on the adhesive canvas is made up of symbols, each of them corresponding to a diamond color. Once you find which color to start with, find the corresponding diamond bag.
We recommend to open the beads bags one by one, according to the color you need. You can also place them in a small plastic bag included in your kit. Don’t forget to write the color number on the bag so you can come back to it while working on your artwork.
Pour a small quantity of diamonds in the tray and make sure the beads are not overlapping and they are facing upwards.
STEP 4: APPLY THE DIAMONDS
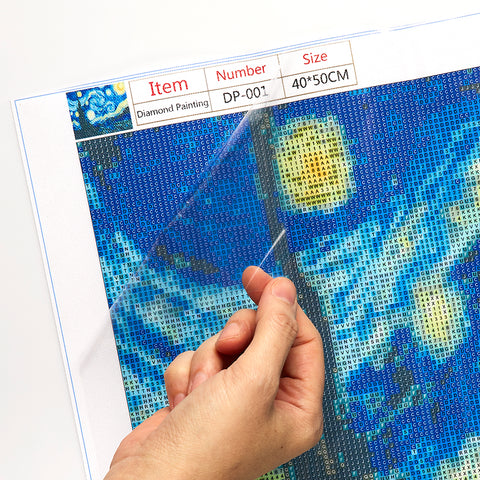
Start by peeling back a small section of the protective film on the canvas. Take your diamond pen and dip it into the wax pad, then pick up a diamond from the tray in the process. You should always pick up the diamond on the relief side of the bead. Place the diamond on the corresponding symbol on the canvas, using the diamond pen applicator tool to press it down gently. Repeat this process until you've filled in the entire section.

If you're working with multiple colors, be sure to work in small sections and finish one color before moving on to the next. This will help ensure that you don't accidentally mix up the colors.

STEP 5: SPEED UP THE PROCESS
In case you have larger parts of one color to complete, you can use the multiple tip! We’ll explain how to do! By using this tool, you can pick up multiple diamonds all at once and apply them to the canvas much faster than using the traditional single-tip applicator.It will save you time but also help align the diamonds correctly. You can use it the same way as the single tip pen, just dip it in the wax, pick up the diamonds on the tray (make sure they are aligned in the tray), and place them on the canvas. Then repeat!
STEP 6: FINISHING TOUCHES
Once you've applied all of the diamonds, use a rolling pin or flat surface to gently press down on the completed sections. This will help ensure that the diamonds are firmly in place.
STEP 7: FRAMING YOUR DIAMOND PAINTING
Finally, your diamond painting is completed! Congratulations! You can now choose to frame it or hang it as-is. Many people opt to frame their diamond paintings, as it gives them a finished, professional look.
Et voilà! You now know how to do diamond painting and praise your skills to everyone who will admire your masterpiece!
Diamond Painting is a fun and rewarding craft that anyone can enjoy. By following our guide on how to do diamond painting with these step-by-step instructions, you'll be able to create a beautiful, sparkling masterpiece that you can be proud of. So, grab your kit and get started today